Editing Header Menus
Quick summary:
Edit the Header Menu for your area's custom header in the Cascade CMS by finding the Header Local asset and working with the Menu Items section. Add, remove, re-order, or otherwise update menu items at the appropriate level, then republish the header local asset to synchronize. Updated Header will appear on all pages set to inherit it. Refresh browser view of website pages to see updates.
Cascade will not automatically update the header menu for you based on the adding of new pages, replaced or removed pages, or site organization (asset tree structure) changes.
Note: The header-local file's system name, metadata, and/or editing panel labels, may not be the same as noted in these instructions. To find the custom header asset you may need to look around a little. TIP: To locate the header-local file currently in-use, go to the Edit panel for the area's homepage and find the Header Chooser's selected path, displaying below the Chooser button. For a Department Home type page, the Chooser is closer to the top. For a Landing type page, the Chooser is near the bottom of the edit panel.
Header Menu Levels | How to Use or Modify the Header Menu | How to Work With Menu Items | How to Edit individual Items | Menu Editing Tips
Header Menu Levels
Three levels are available:
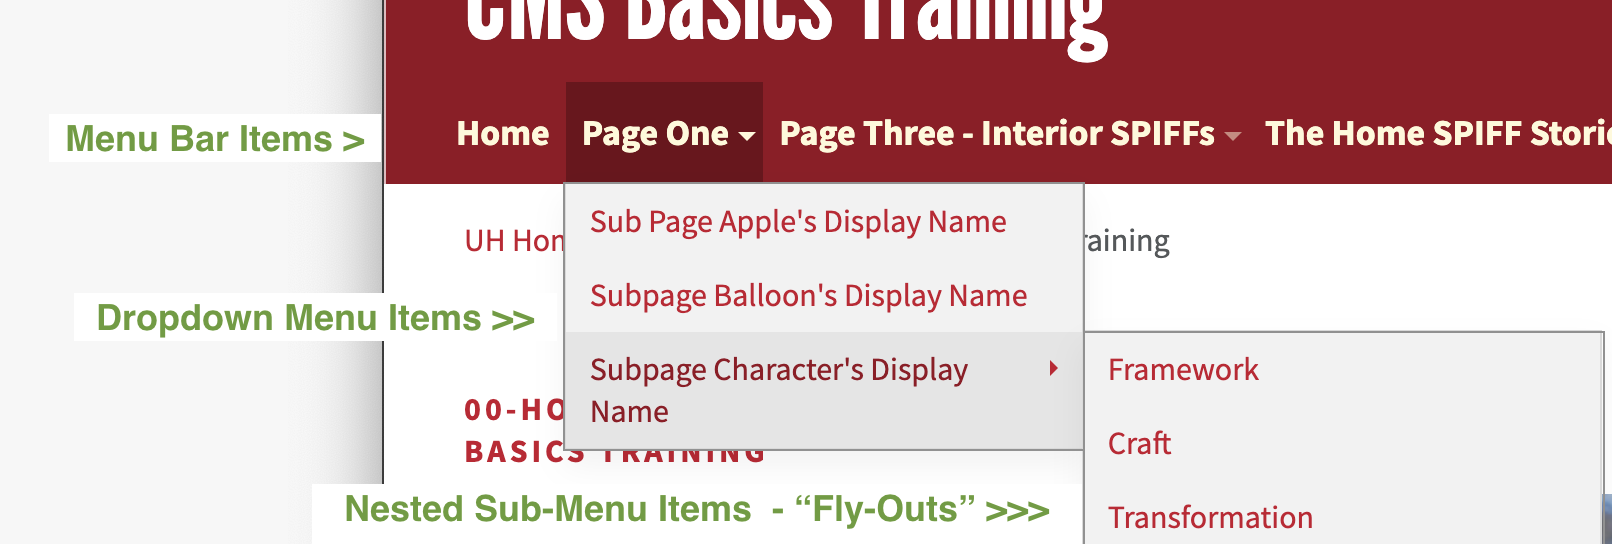
- "Menu Bar Item" >
Represents the main item[s] which initially show on the header's menu bar before site visitor clicks or rolls over anything; First item appears at the far left. Last item appears at the far right. - "Dropdown Menu Item" >>
First level of dropdown item[s]; represent "child" item[s] under one parent Menu Bar Item.
The first item/lowest-numbered item appears at the top;
largest numbered item appears at the bottom; - "Nested Sub-Menu Item" >>>
2nd level of dropdown item[s] - aka "grandchild" items or "fly-out" items;
but still "child" item[s] under one parent Dropdown Menu Item.
Nested Sub-Menu items 'fly out' from the side of their parent Dropdown Menu Item;
however, the lowest numbered item still appears at the top,
and highest numbered item still appears at the bottom of the stack.
Editing Panel Illustrating the Three Levels:

return to top
How to Use or Modify the Header Menu
To use or modify the Header Local Menu, the "Display menu bar" option must be enabled.

With the Menu enabled, the tools to build and modify Menu Items should appear further below.
return to top
How to Work With Menu Items
- Scroll down the Edit panel to where the "Menu Bar Item"s begin.
- As described above, you should see 3 possible levels for each Menu Bar Item set, even if they are labeled as something different than shown or described here. If you do not see three levels, contact either Web Marketing or Web Technologies, as your header local asset may need to be updated.
- TIP: Close up all existing Menu Bar Items to visually simplify the Edit panel. Click on either the top bar or the bottom handle of each tool set to toggle the section open or closed.
- Choose the appropriate parent item [multiple items will be numbered (N of X) within their group; e.g. (2/4) for the Menu Bar Item in the illustration above]. For the main Menu Bar Items, the smallest numbered item appears to the furthest left, highest number to the furthest right. Count the number of distinct main menu items to help you find the set you need from the top level items; then use a similar counting process for the next level down within that set, and so on.
- BEST PRACTICE: If adding multiple sub-directories/menu-items within an area, try to keep the number of sub-directories to less than 7 at any one level or specific area. A too-large number of sub-categories in any given category could indicate the need for a more logical site organization overall.
Publishing Notes
An updated header can be published out independently of the pages which are set to inherit it. Already-published pages will display the updated header when loaded in the browser window, or on refresh or reload, without needing to be republished themselves.
How to Edit Individual Items
Re-order, Add, Remove items
Any of the Menu Item tool sets can be used to re-order items, create additional items, or remove items.
- Items can be Re-ordered by clicking the arrows ( ↑ ↓ ) which appear when more than one item exists within a set.
- New/blank items will be created directly underneath the item for which the Duplicator button (Green plus-sign + ) is clicked.
- Items can be Removed by using the Remove button (a Red x).
Choosing the Page to Link to
For any and every one of the menu items, regardless of the level, you will need to manually Choose the "index" page the item will link to.
Thereafter, Cascade will track the Chooser-linked item dynamically so the links do not break (e.g. if the Chooser's target item is Moved or is Renamed); however, Cascade will not automatically update the header menu for you based on the adding of new pages, replaced or removed pages, or site organization (asset tree structure) changes. Header menu links are strictly manual and will need to be updated manually if any changes may warrant that.

Override Display Name Text Field
Each menu item also has the option to add text. An Editor Instruction should appear above a text field for that item, e.g.:
"Text for Submenu (only when overriding Display Name)
Use this instead of Display Name"
Putting your own text in here will override the metadata from the Chosen page itself.
If left blank, Cascade will pull in the Display Name metadata assigned to the Chosen page itself.
These text fields allow you to add your own text to describe the link/item in the menu. For example, if the listing would otherwise be too long and unwieldy, it could be shortened or abbreviated here.
Menu Editing Tips:
- It can be a good idea to use the menu text override, even if the text you enter is not different from the metadata, to help in visually identifying the item when editing the Header Menu later.
- To make it easier to find your way through the Edit panel for a complicated menu setup, remember you can close up items (or open closed-up items) by clicking on any of the section box's top bars or bottom handles. These are merely toggles. Unfortunately, Cascade will not remember in your next editing session which ones you opened or closed, but this technique can still be helpful in cleaning up the view.
- Items which all exist at the same level can be re-ordered using any ordering-arrow buttons at the right side of the box's top bar. Depending on level selected, whole group would move together.