Creating Links
Create a link (aka a 'hyper-link') in your page content in the Cascade CMS by using any of the WYSIWYG Editors found under the Edit dialogs for either Page type or XHTML Block type assets.
Quick summary:
In the content editor, select the text or image which is going to carry the link and
then open the Insert Link dialog. Create the Link either as Internal (use the Chooser to select the page or file you want to link to) or External (put a path in the Link source text field), then click OK.
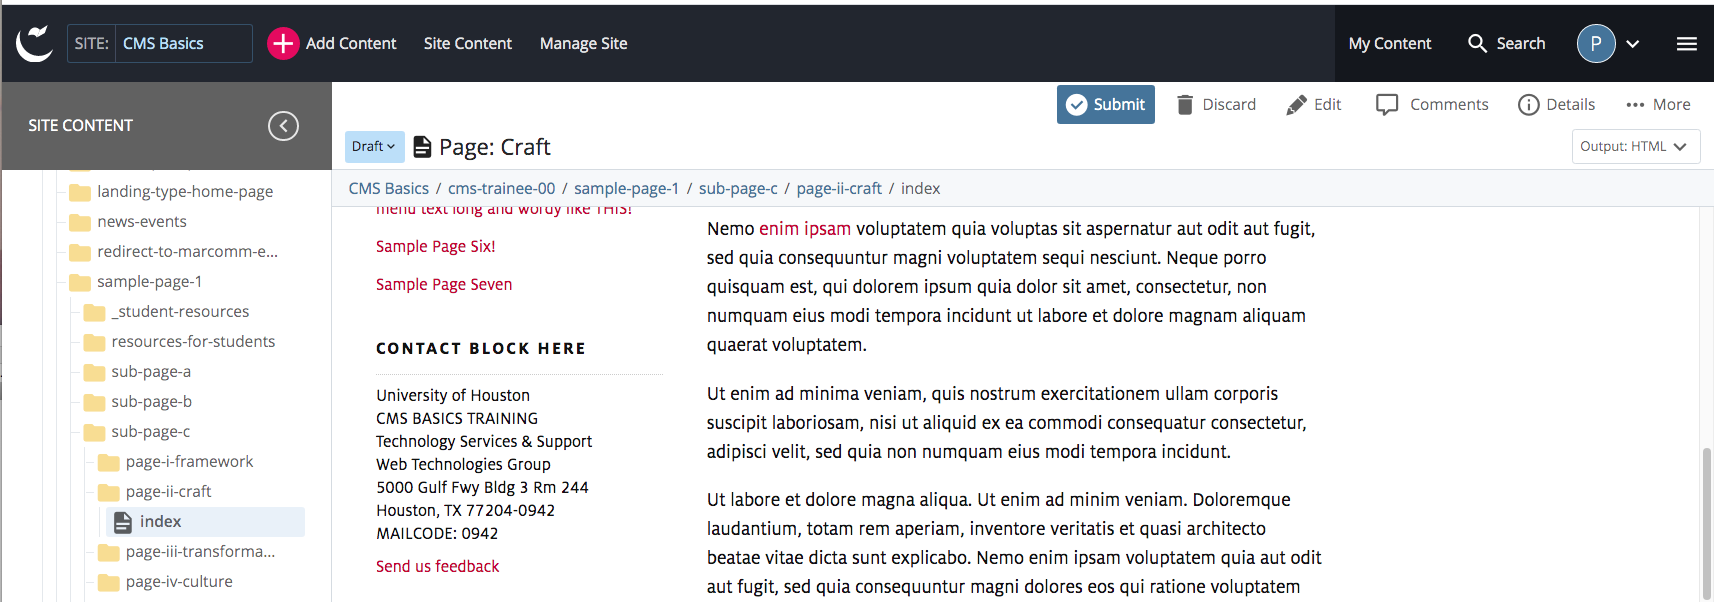
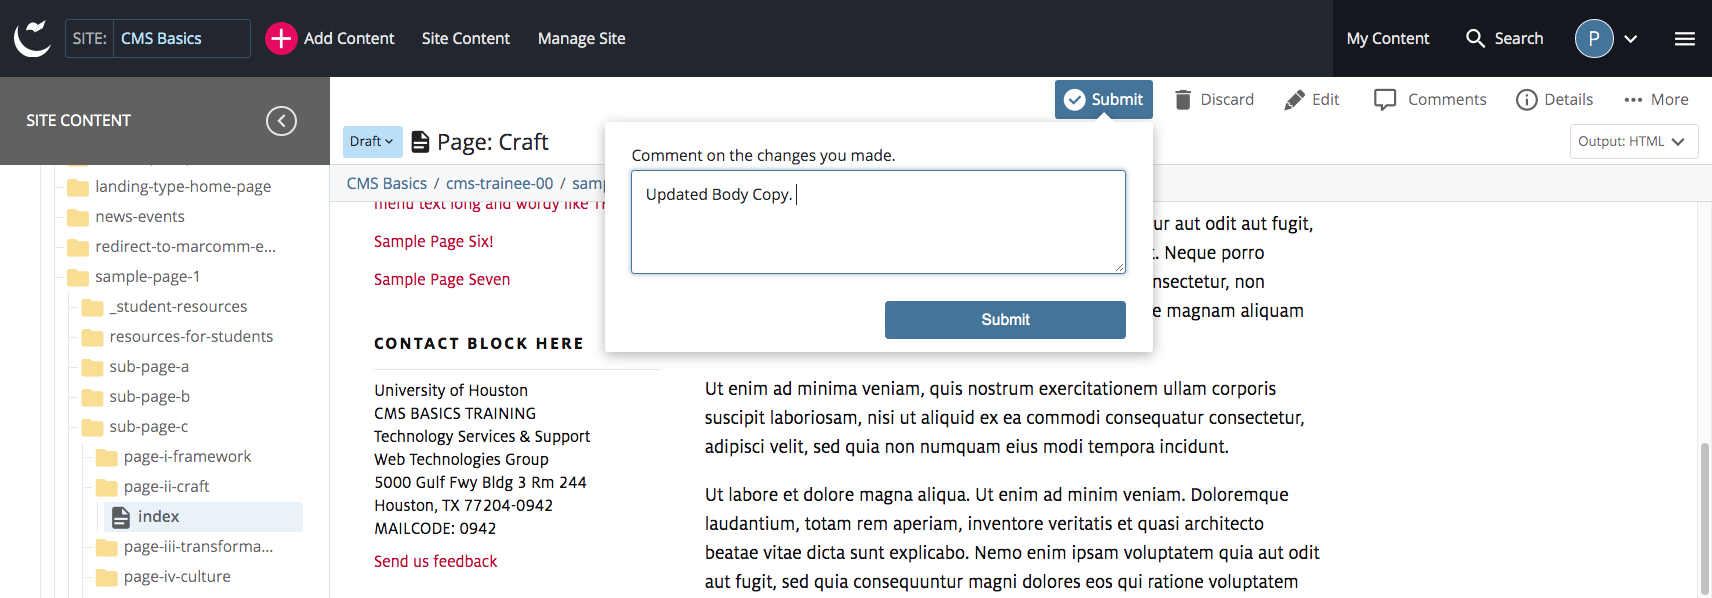
Preview the link by clicking Preview Draft. If it looks good, click Submit to save the change to the active version of the Page asset. Publish the Page asset. Note: whatever the link points to (e.g. a page, file, or web address) also needs to exist on the server for the link to work correctly.
Remember! Please keep accessibility in mind when selecting the text or other material which will carry the hyperlink. For example, someone using a text reader to locate a link on one of your pages won't get much information about whether or not to follow it if the text just says "Click Here". Please give your site visitor a hint as to the result of clicking that specific link.
Steps to Create a Link | Insert Link dialog options | Create an Email Link
How to Create a Link - steps, tips, and notes
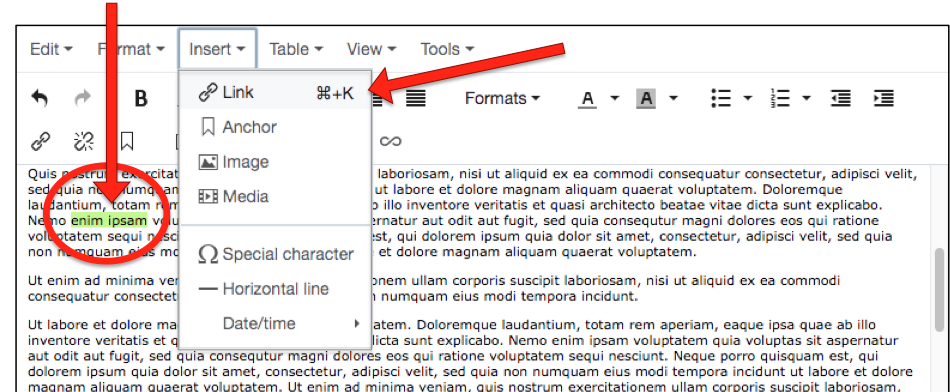
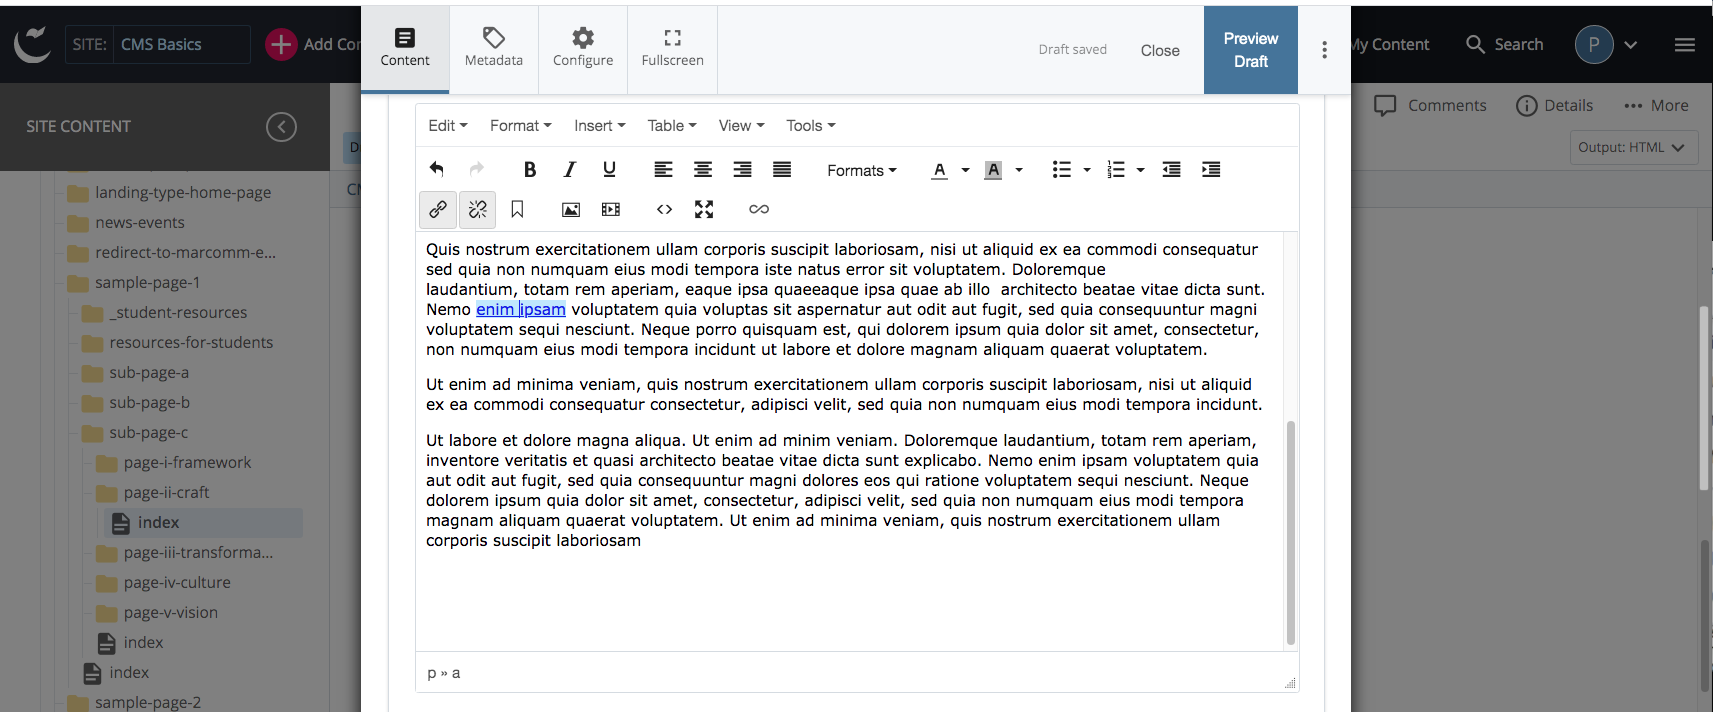
1) First, highlight the text (or select the object, such as an image) which you intend
to carry the link, and then select the WYSIWYG Editor's Insert/Edit Link tool from either the Insert menu or directly from the "chainlink" icon on the toolbar.
NOTE:
When working with links, please remember that the "broken chain link" icon is the Remove Link tool. Using this tool will remove any existing link from your selected item[s]. A caution: if you have inserted custom formatting or additional code related to the link's anchor tag, be aware that the Remove Link tool may remove those additional instructions as well.
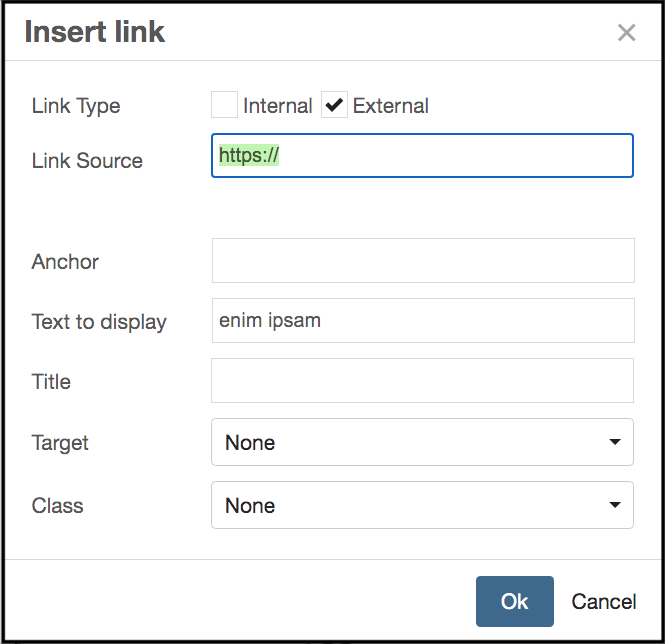
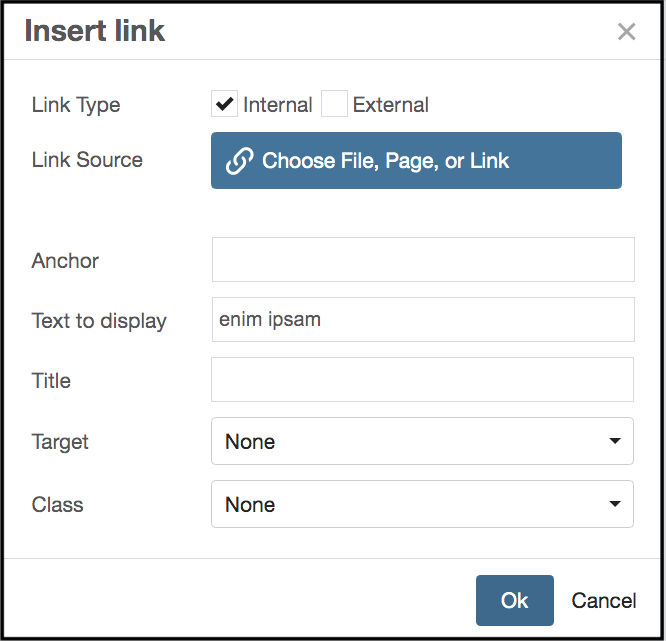
2) The Insert/Edit Link Dialog should appear, offering various options. Your primary choice is whether to make the
link Internal (the default) or External:

Notes on Internal vs External Links
An External Link is any link for which the href/URL path is stored somewhere as a text string - typically in a link source text field or elsewhere in the HTML source code for a webpage. The creation of an External Link means you must provide a sufficient path in the Link Source text field regardless of whether the link's ultimate destination is sourced from within your site or not. This path can be a full URL (e.g. https://uh.edu/mysite/about-us/) or a relative path (e.g. using a site-home-directory: /mysite/about-us/documents/ourfile.pdf ).
External links must be kept up-to-date manually.
TIP: If there is an external site which you link to often from within your Cascade site, one option to make your life easier may be an External Link Asset. This type of Asset can be assigned the external URL, and then you can point Internal Link Choosers towards it. If the external path changes, the External Link Asset would only need to be updated in one place, and the External Link Asset's Relationships dialog (More >> Relationships) would allow you to either republish all pages using that link at one time, or to find each of the pages using it so that they could be republished separately. If you have questions, contact cms@uh.edu.
3) For an Internal Link, click on the Insert Link Internal Link Source Chooser to locate and select the asset you wish to link to.
 With this Choser you may a create a link to any asset which has one of these types:
Page, File, or External Link.
With this Choser you may a create a link to any asset which has one of these types:
Page, File, or External Link.
Cascade will first offer Recent items to select from. If those are appropriate, this can be a timesaver. Be aware, however, you should select carefully and review the information offered to ensure you are selecting the item you do want.
More typically, you would use the Browse panel and tools to locate the desired item:
- Site selector (for Users with access to more than one site - however, cross-site link Choosing is not recommended);
- Search tool;
- System breadcrumb and asset tree browsing tools (where you can navigate throughout your site to find the items you want to link to).
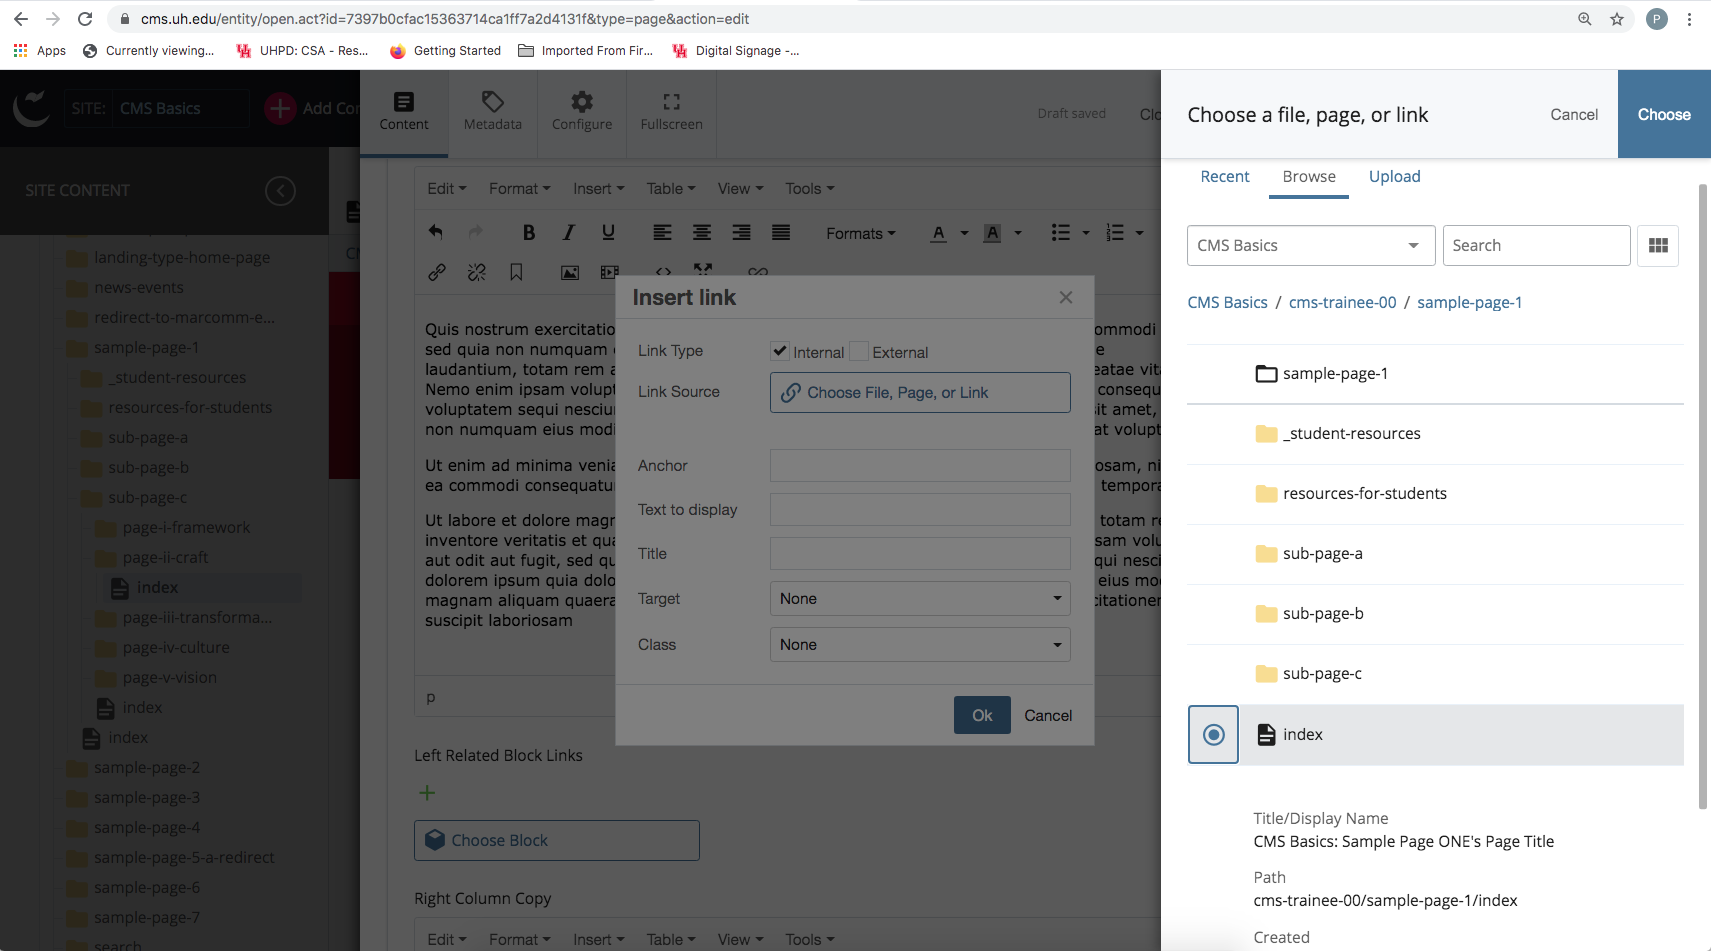
4) When you have selected the desired item, Click the 'Choose' button to close the Chooser dialog.
Note:
With File-Choosing options Cascade also gives you the ability to Upload a new File on the fly - just be aware that you should know where in your site you wish to store
the new item before starting the upload, as you are required to confirm a Placement Folder in the Upload dialog. Otherwise, make a note of the path the Chooser defaults to,
so that you can find and Move the newly-uploaded item later.
TIP: If a new Folder is required to store the newly uploaded items, create it and
Place it beforehand, using the Add Content menu Default items, or by Copying and re-purposing
an existing Folder.
5) With the Chooser dialogs closed, you should now see that the Insert Link Link Source Chooser now shows the item Chosen as well as the system path to that item under the Chooser button itself.
TIP: If the full path is not visible under the Chooser button, hover your cursor over the path to bring up an overlib showing the full system path.
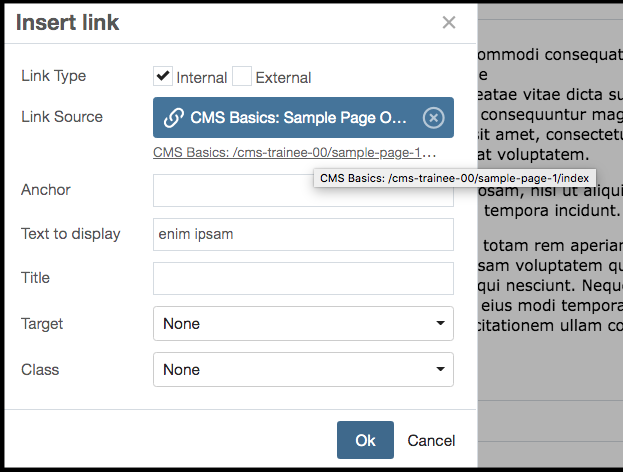
6) Click OK to accept the link settings in the Insert Link dialog.
If everything looks okay, proceed to save your changes with the usual Preview Draft > Page Preview > Submit > add comments if desired > Publish first to Staging to review > Publish Live when ready.
Other options in the Insert Link dialog
Anchor | Title | Target | Class or Custom
Anchor
It can be useful to add an anchor to help guide site visitors to a particular area of a webpage. For more information
about Anchors, please see the Anchors 'how-to' page.
Title
Title text adds accessibility support, letting site visitors know more about the link.
On some systems, the Title text added to a link can pop up an overlib on cursor hover
for additional or reinforcing information.
Target
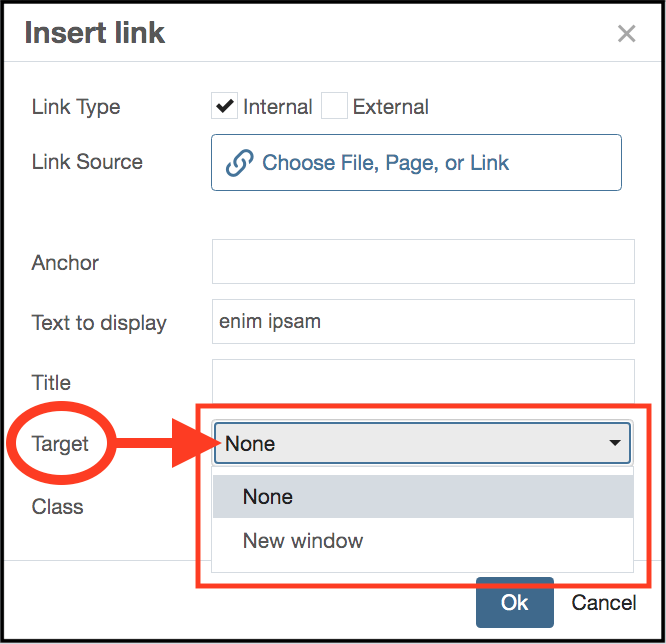 The Target selections are None and New Window. The default setting of 'None' means the linked item will open in the same browser window/tab as the page the site
visitor was viewing when they clicked the link. Usability studies show that this is
the preferred action, as it keeps the site visitor oriented - they can stay in the
same window - plus, they can just use their Back button to return to the originating
page. Also, multiple-window/tab clutter is avoided.
The Target selections are None and New Window. The default setting of 'None' means the linked item will open in the same browser window/tab as the page the site
visitor was viewing when they clicked the link. Usability studies show that this is
the preferred action, as it keeps the site visitor oriented - they can stay in the
same window - plus, they can just use their Back button to return to the originating
page. Also, multiple-window/tab clutter is avoided.
Nevertheless, sometimes it can be useful to open the link destination in a different browser window. If this is desired, then select the 'New Window' option for Target when creating or editing the link.
'Class' or 'Custom' selector
The 'Class' or 'Custom' dialog reveals a list of pre-defined UH-specific CSS styles, which can be applied where appropriate. For links, the 'btn' styles can create the visual appearance of a physical button for site visitors to click. You may also need to use additional related styles not available from this list. For more information about applying and using the 'btn' styles, see the Style: Button how-to. You may also wish to peruse Marcom's Bootstrap information.
Creating an Email Link
 To create an email link, you will use a special variation of an External Link.
Start as usual by highlighting text in the WYSIWYG content editor. The text does not have to be the email address itself. For example, if it may be more meaningful in context, you may wish to use a person's professional title, or their full name, or an appropriate segment of an area's contact information instead.
Open the Insert/Edit Link dialog and select External Link.
In the Link Source textfield, delete any pre-existing placeholder text and start with just 'mailto:' followed directly by the email address itself. Do not use quote marks, and leave no space between the colon and the email address. For example: mailto:personsname@uh.edu
Click OK to finalize the Link dialog and proceed with the page editing as usual.